City Block Standard
City Block Standard
This is the standard for downtown city blocks at BayLUG/BayLTC train layouts.
If you are interested in participating in such a layout, the best way is to build a city block and bring it to a show. If you don’t have a full block however, you can build individual buildings on 32×32 or 16×32 baseplates and combine with another member to build a full block. We also often have space for one or two additional individual buildings on the edges of the city, so bring whatever you have and we’ll find a spot for it.
Whatever you build, please make sure to edit the wiki page for the event you’re attending, and list what you are bringing (under the “Downtown” section), so whoever’s putting together the layout plan can allocate space for you.
City Block Dimensions
The basic city block is a 2×3 rectangle of 32×32 baseplates, or 64×96 studs total. You should build your buildings on baseplates (do not use the 16×16 plates as the base for your buildings) so they line up properly with the roads. You can use whatever size or number of baseplates you need to fill up the 64×96 studs, though most people use 32×32 baseplates for each building.
Your block should include buildings facing all four directions, so the corners of the block should have buildings that face two sides (similar to how Cafe Corner, Grand Emporium, or Palace Cinema sets do).
Note that unlike the LEGO modular buildings (Cafe Corner et al.), which leave up to 8 studs of sidewalk on the baseplate on which they are built, our club standard is that buildings should be built out to the edge of the baseplate they are on. Any sidewalk on your building’s baseplate will be added to the sidewalk of the road, which produces an unnaturally wide sidewalk in total. To avoid this, make sure your buildings have few if any sidewalk tiles on them unless you are deliberately trying to build a wide sidewalk (e.g. for a sidewalk cafe).
It is not necessary to have Technic pins connecting adjacent buildings, as once the roads are connected together it holds the buildings in place quite well. You may include them if you wish. If so, it is recommended to use the same spacing as the LEGO modular buildings.
Open space in the center of the block should have a logical explanation, such as a back yard for one or more of the buildings, an alleyway or parking lot (which should therefore be connected to the outside roads), or other similar use.
Buildings are typically 32×32 but may be any size as long as your buildings combine to occupy a full city block. However, if your block has any gaps they should be 16 or 32 studs wide so as to easily accommodate another member’s building to complete your block.
Roads
BayLUG uses the old style road baseplates from the 1980s and 1990s, with 7 studs on each side and green and white stripes along each side of the road. Many club members have these road baseplates already, so if you don’t have the roads for your block you can probably borrow some. If you want your own, you should be able to buy them on BrickLink or eBay. Here are links to the BrickLink catalogs for each road baseplate:
To make a full city block you need a total of 10 straights, and some combination of crossroad, curve, and T-junctions depending on the layout. However, since adjacent blocks share the road that is between them, you don’t necessarily need all 10 straights.
The roads should have tiled sidewalks (using 2×2 Light Stone Grey a.k.a. “Bley” color tiles) completely covering the studs of the road baseplate. Although the roads have 7 studs on each side, we tile 8 studs on each side, covering up the white line on the edge of the printed road area – as a result one row of the 2×2 tiles are connected by only two out of four possible studs.
On the sides of the road baseplates where the road meets another road, leave 2 studs showing on each side, 4 studs in from the outside edge. (Use a 1×2 tile next to each one to match the rest of the tiling.) We use these open studs to connect adjacent roads using streetlamps (provided by the club).
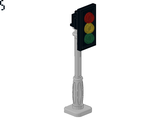
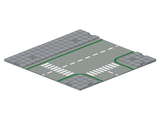
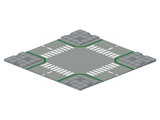
For street intersections (Crossroads or T-Junctions) leave 2×2 plates instead of tiles in the designated positions which we will use to mount traffic signals (provided by Bill Ward):
- Crossroads: In each corner, the 2nd tile in each direction from the corner is replaced by a plate.
- T-Junctions: For cars approaching from each of the 3 directions, they should see a traffic signal on their right hand side on the far side of the intersection. Leave a 2×2 plate in that position.
Here are examples of how to apply tiles and plates to the roads to meet these standards. Click each one for a larger image:
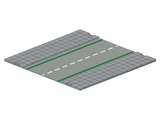
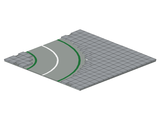
You do not need to make them as boring as this. Especially for the straights and curves, feel free to add whatever decorative elements as long as there is enough space on each side of the road for minifigs to walk around.
For the curves, use whatever approximation you wish to line the edges of the road – just try to cover as much of the white stripe as possible while leaving the green one exposed.
Note: Since road baseplates are shared by the adjacent blocks, remember that if you put decorative elements on the straight roads that must match up with your buildings (e.g. driveways, street furniture, etc.) then when you get to a show it may be necessary to transfer these elements to another person’s road baseplate, or for them to transfer theirs onto yours, if they have similar needs on their side of the street.
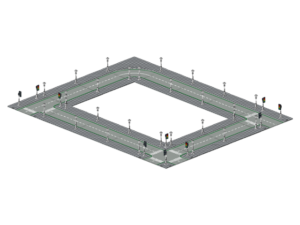
Here is an example of how all the parts fit together to make a layout:
Lamps and Streetlights
Placement
The lamps are used to anchor two adjacent road baseplates together on the exposed studs at the edges of the baseplates.
Traffic signals must be placed so that the cars can “see” them on the right hand side of the road on the far edge of the intersection. Angle the traffic light slightly off of square so that it points at the drivers stopped at the intersection.
Removal
To detach traffic signals, place a fingernail next to the corner of the post base, pressing down on the grey 2×2 plate, and tilt it off the plate.
To remove the lamp connecting two road baseplates, just lift up one road baseplate while holding the other down, and the lamp should pop right off along with its 2×2 grey plate.
Note that there is a 2×2 grey plate at the bottom of the lamp, but for the traffic lights the 2×2 grey plate is attached to the road baseplate. This plate is used to raise the base of the post up above the height of the tiles surrounding it, since it has a nice rounded white base. For the traffic signals, since the 2×2 tile tends to stick to the baseplate anyway, our standard is to leave them there.
Design
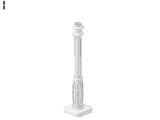
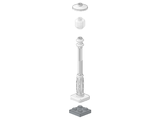
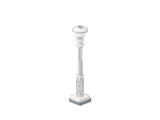
This is how to build a lamp. Note that BayLUG supplies the lamps at our shows, but you may wish to have your own for your own use.
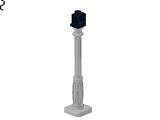
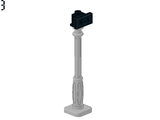
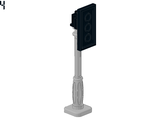
This is how to build a traffic light. Note that Bill Ward supplies the traffic lights at our shows, but you may wish to have your own for your own use.